How to floss with a permanent retainer?
It’s critical to maintain proper oral hygiene, particularly if you wear a permanent retainer. Although these retainers have many advantages, they can make flossing more difficult. We’ll go over the special tips and methods for how to floss with a permanent retainers in this article to keep your smile bright and healthy.

A Permanent Retainer: What Is It?
Your orthodontists will apply a permanent retainer on the lingual surface of your teeth—basically, the part of your teeth that is behind the teeth—after your orthodontic treatment is finished. There is a tiny wire attached behind the front bottom teeth.
It usually rests between four and six teeth. Their goal is to stop the teeth from reverting to their original positions. Lingual retainers can be affixed to one or both upper and lower teeth by orthodontists.
Because permanent retainers function far better than removable ones, many orthodontists prefer them. Approximately 87% of orthodontists preferred lifelong retention, according to a study.
Permanent retainers come in two varieties:
- one that is cemented to each unique tooth.
- one that is only adhered to the teeth on the retainer tips.
A permanent retainer has numerous benefits, including durability, staying undetectable behind the teeth, requiring fewer follow-up visits, and—above all—not needing to be remembered to wear. Nevertheless, compared to removable ones, it may be more difficult to clean and floss your teeth.
Flossing Obstacles with Permanent Retainers: Crucial Information
Now let’s discuss the particular difficulties in flossing when wearing a permanent retainer:
1. Limited Access :
Challenges : Since permanent retainers are cemented to the back of your teeth, conventional flossing techniques are not directly accessible.
Solution :
How to Floss a Permanent Retainer Using Floss Threaders

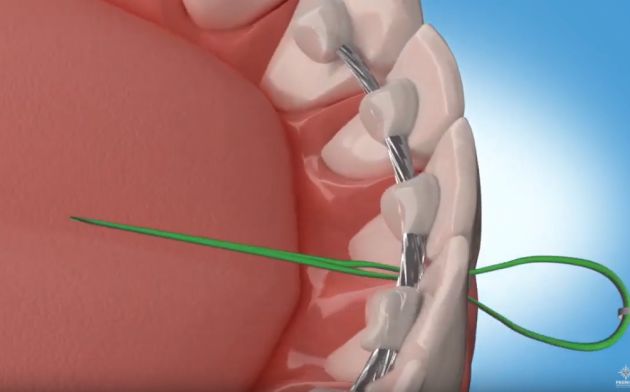
The floss cannot pass below a permanent retainer. You can get your floss under the permanent retainer with the aid of a floss threader. A pliable, thin nylon loop is called a floss threader.
Using a floss threader to floss is similar to sewing. A floss threader facilitates the passage of floss between your teeth and gums beneath your retainer, much like a needle facilitates the passage of thread through fabric.
Using a floss threader:
- Use a floss threader to pass the floss through.
- Insert the threader’s sharp, stiff end between your teeth, under the retainer.
- Once the floss is under the wire, fully pull the threader through your teeth. You can now floss in between your teeth as usual.
- The floss only needs to be threaded once if the retainer is only attached to your front teeth. Without rethreading, you can move the floss along the wire for the neighboring teeth.
- If your retainer is bonded to every tooth, then every tooth needs to be threaded individually. It may seem laborious, but it is imperative that you take the time to take care of every tooth that is connected to the retainer. After finishing, take out the floss.
A useful remedy for your flossing issues are floss threaders. They are affordable, long-lasting, and even reusable for a few washes after each use. You should be able to floss with a threader in less than a minute with practice. They can be easily found in a pharmacy or online.
How to Floss a Permanent Retainer Using Superfloss

Superfloss :
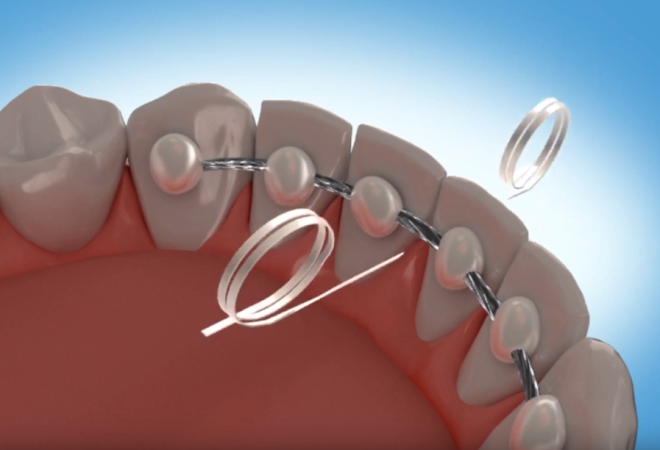
Superfloss is a tufted floss strand that has three parts: a spongy part to clean in between gaps, a regular floss to clean the gum line, and a stiffened end to make it easy to slide under your permanent retainer.
Making use of Superfloss
Start by sliding the stiff end under your retainer and tugging until the regular floss is in place.
With your thumb and index finger serving as guides, wrap the floss around the middle finger.
Utilizing the in and out as well as up and down motions, slide the floss between the teeth.
Superfloss makes things quicker and simpler than floss threaders by removing the need for you to thread the floss through a threader before passing it between your teeth.
The drawback of Superfloss is that it costs more than floss threaders because each piece can only be used once.
Without a threader, How to floss with a permanent retainer?
The solution is a water flosser. If you are uncomfortable using threaders for flossing, you may consider using a water flosser instead. It’s a mouth irrigator. Directing a pressurized stream of water between your teeth and along the gum line can help remove food particles and plaque.
- Using a Water Flosser: A Guide
Fill the reservoir with warm water and attach it to the base. - Select a gratuity based on your needs. Tips for specific needs, such as cleaning periodontal pockets, orthodontics, and plaque removal, are included with water flossers. Kindly slide it into the handle.
- Adjust the pressure control.
- Hover your body over the sink. Activate it. Shut your mouth partially to avoid splattering.
- Your back teeth should come first. Point the tip at your lower lip. Water will trickle out of the sink.
- Proceed along the gum line, stopping occasionally in between teeth.
- Floss the front and back of your teeth.
- After brushing, floss for a minimum of one minute each day.
For children or teenagers who have trouble using traditional floss, water flossers may be the best option. Additionally, it is advised for those with poor manual dexterity or periodontal issues like gum sensitivity.
It is important to remember, though, that water flossing cannot replace brushing. Compared to regular floss or threaders, water flossers are more expensive. It cannot be carried about. It could take some getting used to and can be messy.
Conclusion:
You are committed to the long term when you wear a permanent retainer. Therefore, the best option is the one that suits you. something to which you could easily become accustomed. Be dependable in your routine, no matter what you decide. By choosing one of the aforementioned techniques, you are making the commitment to long-term dental health now.


